Tutorial Wagtail Version: 2.x
Setting Up A RichText Content Area
In Wagtail you can have two Richtext areas: a model field and a StreamField. In this article we'll cover the model field type.
RichText is a name for a WYSIWYG (what you see is what you get editor) editor in Wagtail. Because Wagtail is flexible and comes with the notion of Streamfields, we have two options to add RichText to our pages. The option you choose depends on the design of the website you're working with and the limitations it should apply. If you're wondering why we should limit users capabilities in a CMS, read The Zen of Wagtail.
The two options we have are:
- A model field
- A stream field
In this tutorial we're only going to learn about the model field type. Although it's not a big jump to turning this into a SteramField, which is covered in this tutorial.
Model Field RichText
If you have experience with Django, you'll be familiar with the idea of Models. The short version is: Django models are a way to map data fields in your code to your database. Django and it's awesome ORM will take care of creating database tables, columns and indices for you if you tell it what you want.
For example, here's a basic Django model:
In the above code snippet, the models.CharField() is the "Model Field" I'm referring to in this article. but CharFields and TextFields are boring. Sometimes you want to give the user an option to bold, italic, embed an image, create links and so on.. all without having to write any code.
In Wagtail, it's really easy to do this. Take a look below:
In the above code, we're doing the following:
- Importing FieldPanel, RichTextField, and a Wagtail Page.
- Create a new class called BlogPostPage. The (Page) means it inherits default Wagtail page setup, and goodies like previews and drafts.
- Told it which template file to use.
- Created a field called "richtext". This one is key. It's not using
models.TextField(), it usesRichTextField()instead. - Lastly, we gave it 2 fields to display in Wagtail Panels: the default title (title comes from Page), and the RichTextField. Both are in a normal FieldPanel.
If you're following along and added the RichTextField, you'll want to run migrations at this point.
Once you're done that, open up your website and create a new Blog Post Page. It'll look like this:
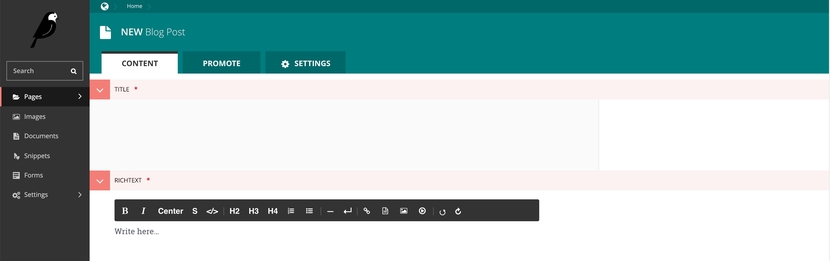
The image above displays a new WYSIWYG editor with all the features pre-loaded. No more coding for your CMS administrators and content editors!
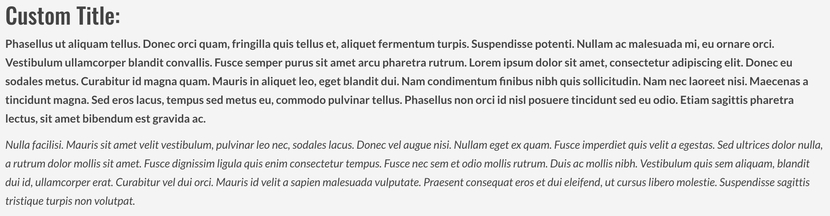
The last piece of this is adding the RichTextField value (the content that's written) to your template. This isn't a regular TextField like what Django provides. There's some beautiful magic behind the scenes for working with links, images, documents and embeds. For that, we need to use a Wagtail Template tag in our template.
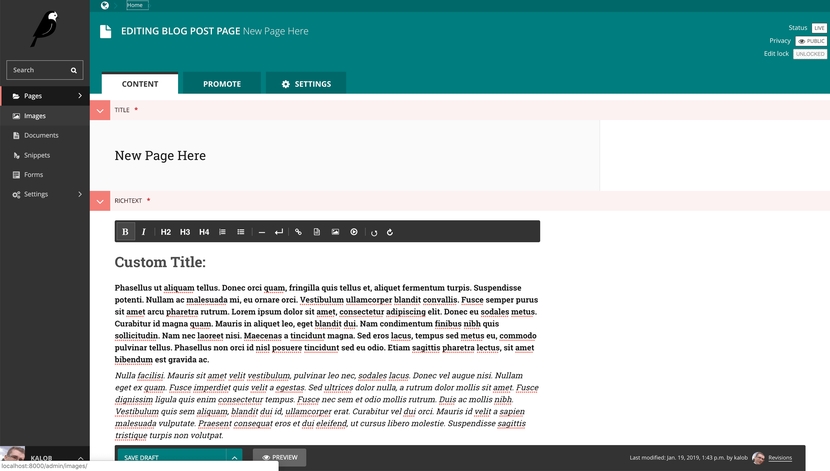
Let's fill out some sample data when we create a new page.
I won't show you the entire base.html file, but I'll give you the blog_post_page.html template file. It's super simple, really, all we need to do is load one template tag and use it.
I'll explain the above, step-by-step just in case any part isn't clear.
- We "extend" from base.html. That's our main file that all templates extend from.
- We're loading "wagtailcore_tags". This allows us to use the |richtext feature later.
- We create a new block called "content". This block matches the block found in base.html. Yours might be called "body" or something else. Adjust as needed.
- We've asked the view for self.richtext (that maps to the
richtext = RichTextField()in our model file). And then we applied the|richtexttemplate tag to it. This will take the Wagtail editor (called Draftail) and make sense of the images, documents, embeds, links and anything else that's not using regular HTML markup, and turn it into regular HTML markup. - Lastly, we've closed the content block. Everything between the two content block lines will be injected into base.html.
If you've saved all of that, and you've applied any migrations you might have... preview or view the live page, and it'll look something like this:
The complete code.
If you're just looking for the source code, I've created a Gist for you to consume.
Related tutorials
Setting Up RichText Streamfields
Posted on
In Wagtail you can have two Richtext areas: a model field and a StreamField. In this article we'll cover the Streamfield type.
View lesson, Setting Up RichText Streamfields
03. Setting Up Allauth In Django
Posted on
View lesson, 03. Setting Up Allauth In Django
32. Backing Up and Restoring Content and Media
Posted on
View lesson, 32. Backing Up and Restoring Content and Media
Setting up Django Shell, Shell Plus and IPython
Posted on
Django comes with a python shell where you can import your models and test things out. It's not great out of the box, but we can make it better by using shell_plus (installation instructions are inside) and letting IPython take care of interactivity. This is all helpful for learning Wagtail.
View lesson, Setting up Django Shell, Shell Plus and IPython
Setting Up RichText Streamfields
Posted on
In Wagtail you can have two Richtext areas: a model field and a StreamField. In this article we'll cover the Streamfield type.
03. Setting Up Allauth In Django
Posted on
32. Backing Up and Restoring Content and Media
Posted on
Setting up Django Shell, Shell Plus and IPython
Posted on
Django comes with a python shell where you can import your models and test things out. It's not great out of the box, but we can make it better by using shell_plus (installation instructions are inside) and letting IPython take care of interactivity. This is all helpful for learning Wagtail.